Saturday, December 28, 2013

The wigpost

Hey everyone!

Welcome again :D
I said (long ago) that I would dedicate a post to my wigchoice.
I've searched for some time and I think I found the wig that I want.
I first had to decide what kind of hairstyle I wanted.
Long, short, curly, straight, with bangs, without bangs, etc..
I liked a medium wig. I have mediumlength hair myself and I think it would suit the costume nicely.
But my hair is blonde and I want some kind of white or very light grey. Blonde can be alright, but I would only not wear a wig if I don't have a white one, so only in "emergencies".
I searched on google (yay for google again!) for some reliable sites which sell wigs. I prefer to buy from webshops other then those on ebay and amazon. Don't know why, I just do.
There are 3 sites that came up most:
- epiccosplay.com
- arda-wigs.com
- cosplayanimewigs.com

All three have nice wigs. But I don't know much about wigs so don't ask me about quality :P
At first I had my mind set on a wig named claudia:


http://arda-wigs.com/products/claudia
But later on I found a wig on cosplayanimewigs.com which is cheaper but which I might even like better:
http://cosplayanimewigs.com/20whhestculo.html
I would have to model the bangs to my likings. Hope I will succeed.
This wig is less "full" but I actually like it anyway. Love the soft white color and the curls/waviness.

Once I've ordered the wig (which will probably take a while, so don't count on that happening soon) I will post again.

Thanks for reading!

Cya!
~Vom

Friday, December 27, 2013

Concept art

Made a drawing of the clothing of my cosplay design.

The experiment

Heya!

Wow it has been exactly 2 months now since my last post!
Oopsie..
I hereby inform you on the fact that I'm still alive and working on my cosplay...sorta.
It has been busy past few months and I think I still won't be able to post as much as I used to when I started blogging. Nonetheless, I'm still motivated to fulfill my goal (completing my human Amaterasu cosplay).
I'm embaressed to say that I actually started experimenting a little with pu foam, which is (if I'm correct) just the sprayable variant of polysterene foam. I cut a circle out of cartboard and sprayed on both sides.


Much cool,
Very cirle,
Wow.


One at a time of course, the foam needs to expand and harden completely.

Sadly the cardboard was bent during the expanding process.
I cut the foam with a crafting knife in the shape I wanted, which was the Divine Retribution (which is now of course not straight because of the cardboard -.-)


Design sketches of the Divine Retribution

Once I got the shape I wanted, I covered the shield with plaster band. A few layers.
Then to fill little dents, I used the stuff you use to fill little holes in walls, I honestly have no idea what it's called XD


Once I finished that, I started sanding it with sandpaper.
Still not finished doing that but so far it looks okay. Except for the fact that it is bent. :(
Oh well I will just have to live with it....

In the end I will paint and varnish it.
I still have to decide how to make the flames, probably some kind of fabric?
Suggestions are very welcome!

Well, you guys are fully informed again :)
Cya!
~Vom

Sunday, October 27, 2013

An idea found its way into my head!

Hello :)

I came up with an idea:
Since those foam boards come in packs of about 5 or so(?), I could make multiple props. I'm probably going to be at Abunai the entire weekend, so all three days. If I have the time/material/motivation left to make any more, I could make 3 props! One for each day. One would be Tsumugari, the second would be the Reflector and the third one would be a paintbrush I think.
I could attach the Reflector to my obi using metal wire or something.
Well that was the idea that just popped up in my crazy brain :P
Cya!
~Vom

Saturday, October 26, 2013

Plan of attack - propmaking

Hello everyone :D

Today I was thinking, why not blog about how I am planning on making the glaive Tsumugari!
This is the glaive (I think it's so bad ass 8D):
Amaterasu wielding the glaive Tsumugari
So you'd probably think: Seriously? You know this is impossible because of all the floating objects?
Yes, I know. That's why i'm gonna cheat a little ;) I'm gonna attach the cloudy things to the glaive itself, this will make it one piece, but that's okay.

So this is the plan:
First I will be cutting the base model of the sword out of a block of insulating foam board. I will try to already carve as many details in as I can. When that’s done, I will cover the model in plaster cast. The stuff is not too expensive and not too hard to model. It’s actually more like wrapping the model in plaster cast. Any dents will be filled with regular plaster after the cast is completely dried out. The method I’m thinking of, is just put a bit of the paste on the prop and smear it out with a flat object like an old gift card. The regular plaster can also be used to apply any more detail to the prop. When that’s dry as well, it’s time to sand. I will probably use sandpaper as I do not have any other tools that would be appropriate (not sure if any exist to be honest). The next step is to apply at least one layer of paint on it before I can start on the real paint job. Maybe I will put 1 or 2 layers of the ground color of the sword underneath it. For example: I will paint at least one layer of pure blue on the prop as Amaterasu’s glaive is blue. The cloudy things will have a yellowy layer underneath the visible layer of paint. When the final layer of paint is all done, I will finish the prop with some varnish. For the clouds, I use a matt varnish. For the rest of the glaive, I will use a shiny/glossy varnish. I bought them for just 1,50 euro. This is just a little over 2 dollar. I got three bottles, two of the shiny varnish and one matt. Each bottle contains 80 ml. According to the label, you’re supposed to paint 3 layers on the painting, or in this case, the sword, waiting for 2 hours after each layer. Once 24 hours have passed the prop should be water resistant! Sure hope this method is gonna work out!
And as always: if you have any tips on propmaking or some advice, feel free to share! :D
~Vom
Edit: My brother thought it would be a got idea to reinforce the glaive with something like a wooden plank or something so it won't break easily. Thanks, bro!

Tuesday, October 22, 2013

Accessories!

Heya!

I noticed I haven't really told you about all "accessories" yet, so I'll tell you about it today! :D

First of all, I am so sorry for not writing in such a long time. I have been busy with school, got some tests 'n stuff, and there are a few yet to come, but I guess I gotta feed you something ;)

ALRIGHT! Let's get back to what really matters: the costume!
Or to be more specific, as I already told you, the accessories. What I mean with accessories includes footwear.

The accessories:


Of course there is the wig too, but I want to have a post all about the wig and the face paint.

So here is a list of the accessories I'll discuss in this post:
1. the "shoes"
2. the socks X)
3. the leg warmers
4. the gloves

Let's start with the footwear.

1. The "shoes"
I sure as hell ain't gonna walk on my bare feet right?! Nope, and to make it fit in with the kimono, I decided to go for geta!
Geta is some kind of wooden flipflops :P It's a real western description, sorry XD
There are more kinds of geta than just one, but I am still doubting about this. (Really thought I figured everything out in detail, but I calculated what this cosplay was gonna cost me and decided to see what I could save money on.) At first, really liked these geta: 
http://www.amazon.com/JAPANESE-Kimono-Zori-Sandals-American/dp/B00BN4145M/ref=aag_m_pw_dp?ie=UTF8&m=A2LH0JQC0KF8T8

 But lately, I came across these and acutally prefer these because of the beautiful wood:
http://www.ebay.nl/itm/JAPANESE-Kimono-Zori-Geta-Sandals-24cm-NEW-RED-57-/130997025699?pt=LH_DefaultDomain_0&hash=item1e8007fba3&_uhb=1

(Let me know what you guys like best!)

But there is also another kind of geta, and I am sure you have seen these somewhere. A pair of these geta have a very simple design: 6 planks and 2 thongs.
I would never have thought of it if a friend of mine came up with the idea (thanks!) for making them myself!
This is the link he sent me for those who are interested:
http://www.wikihow.com/Make-a-Pair-of-Geta-%28Wooden-Sandals%29
So if I decide I want to spend less, this is a good alternative.
I could always paint it too by the way! (These things are so obvious, yet I don't think of it, or think of it after way too long..)

2. The socks
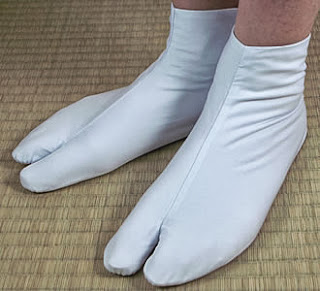
Right, let's get on with the next item. The socks. Or tabi, actually. Why? Because these bitches are made to be worn in footwear with a thonks between your big toe and the rest of the party!


Tabi

Traditionally these aren't worn with these geta. One is supposed to walk on them with bare feet. Like the western flipflops. But as some areas of the con-hall might be cold, it would be wise (ha me and wisdom) to wear a pair of socks. It would probably be a little more comfortable as well as I will be walking (litteraly) on a pair of wooden planks. I feel like the only choice in socks I would have is whether I will be wearing green or white tabi. Kidding, white of course. The tabi in the image above are made from some kind of silk or satin fabric? I dunno, it is really comfortable (I have a pair here, just not the right color). But the ones I'm going for are cotton ones, I pressume the same kind as average socks. 

3. The leg warmers
Something I really want to add are leg warmers. I just love 'm. I want them to be red. Now I can think of 3 options on how to get these:
1, just buy them!
2, buy long red socks and cut the bottom half off.
Or 3, make them out of the left over red fabric.
Why would I even consider the second option? Because I prefer them to be a little tight. Huge wool leg warmers just aren't right for the costume! Not sure if leg warmers are at all, but I'm prepared to give it a shot.

4. The gloves
Really doubting about where I want to get these, maybe I should try to make them myself? 
I saw these awesome gloves on amazon.com:
http://www.amazon.com/Serenade-Length-Fingerless-Stretch-Gloves/dp/B00B02LBIW/ref=sr_1_19?s=apparel&ie=UTF8&qid=1379890065&sr=1-19&keywords=long+gloves
But I see two disadvantages here:
1: There is a chance that the color could be just a little off. Would be a shame.
2: It's satin. This fabric might look beautiful and it totally does, but if someone were to take a photo with flash, it wouldn't look good, as satin is shiny, therefore reflecting. This could ruin a picture.
So maybe I will just make something like it. Again, out of leftovers from the red cotton I will buy.

So this concludes my post on my planned-to-use accessories. Maybe there will be an update on this subject. Who knows!

Thanks for reading!
~Vom

Thursday, October 3, 2013

Sketching at school

Hey everyone,

Today at school I made some sketches (I was kinda bored XD). I just drew them quickly and without any extra lines (I mean the ones you erase later on) so you may notice that some bodyparts might be a little out of proportion. (Don't kill me please! D: )

So here are the drawings:

Out of proportion, not paying attention to details (c'mon just ckeck out those fingers on the right one, left one doesn't have any, that doesn't count XD) I have a lot to learn!


And here is another drawing of me on my way to the trainstation (almost) every morning on schooldays:


Ugh I just noticed I really didn't pay attention on finishing the nose XD

Alright well, this was just a post because I made some drawings and I thought, heck, why not post them. Now you guys know a little more my ideas. Btw, I'll explain more about the accessories at some point.
I am probably just gonna devote an entire (WOOAAH) post to it.

Cya!
~Vom